Friday, December 28, 2012

Happy Holidays 2012

It's been an exciting holiday in our new home.  To close out 2012, I wanted to share with you just a few snapshots from the past couple weeks, to give you a feel for everything going on in our corner of Missoula.

There was of course candy making.  This year I only made toffee and peanut brittle.  This was taken right before the brittle turned dark and I realized my thermometer was not working correctly.  Time to reinvest in an official candy thermometer.


What would the holidays be without a kitchen out of control?  On this particular evening I was tackling Spice Cookies and candy at the same time.  Multi-tasking may not be a good idea in the kitchen.  Especially when there is something on the stovetop.


Mmmm, appetizers.  This year we enjoyed appetizers for Christmas lunch, because really - who can eat Christmas lunch, appetizers and Christmas dinner?  But yet, I'm not willing to give up the appetizers!  I like a savory brie and this fit the bill.  I mixed up some chopped walnuts, prosciutto,salt, pepper, and some Mushroom Sage Olive Oil for on top of the Brie.  This I baked and the prosciutto was crispy as the brie started to ooze.  It was yummy!


What is that you see?  A rug and furniture in the living room, the Saturday before Christmas was so exciting.  Our furniture was delivered and good friends arrived from Green River to share the holiday with us.


We went with the traditional (ok, not so much) Rouladen and Spaetzle Christmas dinner.  Watch for a full blog post on Rouladen and Spaetzle in the future, in the meantime, trust me when I say - yummy!  Until next time, Rouladen is thinly sliced meat rolled up with bacon, pickle, and onion in the middle.  Below you see it right before the rolling stage.


Friends.  I can not express enough how special it was to have Lorna and Marco share this holiday with us in our new home.  The four of us explored the local breweries, laughed, and talked.  We skied twice and went for a couple great walks, including a really nice Christmas morning walk out our back door and into the hills and woods.

 
Joe and I want to wish you and yours a very happy holiday full of friendship; family, if you are close enough; and joy. 


Tuesday, December 18, 2012

A Home

So, how long do I get to ride the "busy from moving" excuse when it comes to not posting very much? 

As you've seen the kitchen has been up and running, but the house has still been pretty bare for about 2 1/2 months now.  During that time, we've needed some comfort food to deal with the empty rooms.  As I was thinking we needed comfort food, I noticed that The Good Food Store, which is the most amazing store ever, had locally raised pork roasts on sale.

We all have a different idea of comfort food, but to me the crock pot can turn out some pretty tasty comfort food.  So, I got up one morning and I browned the pork roast.  I simply sprinkled it with salt, pepper, and thyme and browned it quickly.

 
I cut up some vegetables and put them in the bottom of the crockpot.  I chose onions, fingerling potatoes and sweet potatoes.  Carrots or other root vegetables would work, if desired.
 

Don't forget the splatter screen when browning at high temperatures.  Wouldn't want to mess up the new counter tops!  You would not have to brown the piece of meat, but I feel like it really adds good flavor.


Then I just top the raw vegetables with the browned pork roast.  This same recipe can be followed with any piece of meat.  When using the crockpot for a long slow roast of any type of meat, put the raw vegetables in the bottom and the roast on top.


Cover and cook.  I let this cook on high for 7 hours and ta da!  The pork roast fell apart and was very moist and flavorful.  This was perfect with a small side salad.


It felt like Santa had come yesterday, as we finally got furniture for the upstairs living room delivered.  We have furniture and a rug, which finally encouraged me to put some white lights around the windows.  Last night as I walked around turning off lights, I stopped at the doorway to that room.  It's the first time this house we bought and love feels like a home.

Saturday, December 8, 2012

New Kitchen

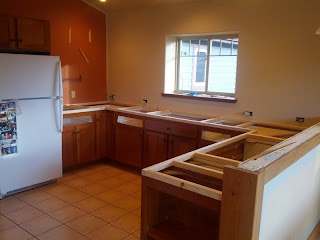
I've had this post ready for a week, but I've had problems getting my pictures off the phone.  It's always something, isn't it?  Are you ready to see the new kitchen?  It's pretty cool.  While we didn't change the layout, the height of the counter tops is perfect and I could purr over the new sinks and faucets.

These pictures aren't great, but you'll get the idea.  This is the view from the patio door end of the dining room.  The whole upstairs has been repainted.  The back accent wall is called Spiced Ginger.  Isn't that a nice color?  The fridge will be the next thing to be replaced.


The view from the living room end of the dining room.  We raised all counters a little over two inches and replaced the laminate counters with quartz.  The sitting island in the right side of the picture was also extended.  It needed more width.  The stools are on order!


The view from the hallway entry to the kitchen.  After raising all the counters, we raised the upper cabinets so they are a traditional 18" up from the counter top and we put in this amazing under cabinet lighting.  The lighting is so cool and the electrician did a great job.  One switch turns on all the under counter lighting in the kitchen.


Could I be more spoiled with two big sinks?  Following is the new sink under the window.  This is my vegetable prepping sink and it tends to hold the rinsed out coffee pot, since that is set right next to it.  We love the faucets we chose.  The handle pulls out and the sprayer works perfectly.  Plus, they are the perfect height for getting pots under them, but not too high, so they don't splash water all over.  Next to the faucet you see the dish detergent, hand soap, and the button for the disposal.


This is the dish washing sink and I had no idea how much we would love it!  You can fit a large cookie sheet flat in the bottom of this sink and it's much deeper than it looks in the picture.  That means it holds whatever you want and the water doesn't splash all over as you try to maneuver a large cookie sheet or cutting board in a smaller sink while rinsing it off!  Say it with me, Ohhhhh Ahhhhhhh.


I have the feeling a common piece of this blog is going to be "Views from the Kitchen Window", since I love my views so much.  We'll end this little blog post with my view this morning which has finally turned to winter!  The skies are clearing as I type and I'm sure I'll have to take another picture soon.

Monday, November 26, 2012

A Thanksgiving Poem (of a sort)

Twas the night before Thanksgiving, and all through the house, the workers were scattered and not quiet at all!

The painters worked diligently and quiet as mice, amidst all the sawing, banging, and voice.


The counter guys carefully put the counters in place, before sawing the holes for the stove top and outlets.


The plumber hooked up one sink, as the second hadn't arrived.

     The cabinet guys raised the upper cabinets and trimmed the raised counter edge.


            Only the electrician was no where to be found.

As they exited the house, one by one, the house was left with a layer of stone dust and calm.

Joe jumped on the job of cleaning the kitchen,

       And, the cabinets were cleaned and refilled in a smidgen,

To sleep they both went, with visions of pie dancing in their head.


Christine arose on Thanksgiving day, with no prep done for the beautiful meal on the way.

But with the knowledge of water and plenty of counter space, on which to,

     Roll out Pie dough ...


          Chop vegetables for stuffing ...


               Make a few appetizers for a mid-day lunch ...


and finally pull together the perfect size Thanksgiving meal for two, complete with, Maple Cider Glazed Turkey,
Stuffing,
Green Beans,
Pear, Pecan, Blue Cheese and Cranberry chopped salad,
Pecan Pie, and
Pumpkin Souffle.


There was even time for a walk on Thanksgiving afternoon.  I couldn't be more thankful for all of these people coming together to make our kitchen so perfect. 

Soon the final touches will be in place and the kitchen will be finished - watch for the final pictures to come!
 
Please note - this author claims absolutely no poem writing experience or training!

Wednesday, November 7, 2012

An Easy Pasta

So often we find ourselves with busier days than we'd expected, or maybe hoped to have.  In these situations, it's good to have a warm comforting meal at the end of those day when you look in the fridge and wish something would magically appear.

Ta Da!


Well with just a few vegetables and some pasta, maybe a stray slice of bread and some grated parmesan cheese you can create something very comforting.  The other night my husband said, something to the effect that I could make this more often as he dug into his bowl.

This is one of those without a set recipe.  I had an idea and went to the fridge to see what veggies I had.  Broccoli, cauliflower, and kale will do.


Then I thought, hmmm, I'm going to want some crispy, meat cheese flavor.   Just a little.  So I chopped up some Pancetta. Would you like a little meat flavor but dont' have any pancetta?  Just one slice of chopped bacon, some ham, or prosciutto would do the trick!


And made some yummy breadcrumbs.  Whenever I want some crispy breadcrumbs to cover some pasta or something.  I put a slice of bread in the food processor and mix that with salt, pepper, grated parmesan to please, and chopped parsley, if i have it.  This time I also added some flax seeds. NOTE - the picture below is finished, do not add the cheese until after you've browned the breadcrumbs. 


With parts collected, it's time to cook and assemble.  There are two pans here.

Pot One:
I started by putting the water on to boil for the pasta and vegetables.  For the pasta I actually used a Gluten Free pasta by DeBoles.  It was good, the Multi Grain Penne with rice, quinoa and amaranth.  I just figured out how long the pasta needed and about 4-5 minutes before it would be done, I put the broccoli, cauliflower, and kale into the same pot to lightly cook.


Pan Two:
While the water is heating and the pasta and vegetables are cooking, I set some olive oil to heat in a pan.  When it was warm I added the chopped stems of the kale and pancetta to crisp a bit and then I added the breadcrumbs  (chopped bread crumbs, salt, pepper, and flax seeds) and some chopped garlic to that pan to brown up.  If you are feeling decadent, add some butter to this mixture.  Mmmmm.


When the breadcrumbs are toasty, take off the heat and mix in the parsley and parmesan.  The beauty of no recipe is you can mix in as little or as much as your heart desires!  Drain the vegetables and pasta add the breadcrumb mixture and toss.

Bon Appetit!

Friday, November 2, 2012

Pear Pie

We've talked about pie before.  But it seems people are still intimidated by pie.  What throws people? Is it the crust?  Maybe the time it takes to peel fruit?  I am here to say "No More"!  Pie gives too much joy, it should not be put off for the fear that it won't come out perfect. 


I make a lot of pies and maybe one in three crusts is great and half the time I don't get it done in time for it to rest and it doesn't come out in pretty set shapes, but is a little runny.  They are still eaten quickly and they still make the people I made them for feel loved.

I recently made a pear pie.  Did I mention the Asian Pear tree we have?  These pears are not as soft as some, even after cooking.  I probably could have used more sugar, I'm always cutting the sugar.  And, I probably could have improved the crust by using white flour, even some white flour.  But you know what, it's still tasty!

Here's the general direction I take on pie, but if fruit pies are too much work, do something easy like a pumpkin or a pecan pie.  You could always {gasp} by the crust at the store, too.


Basic Pie Crust - This is the basic flaky pie crust I've been using.  I like 1/2 butter and 1/2 shortening and this is the Basic Flaky Crust out of "Pie" by Ken Haedrich, except I never use white flour.  It makes one crust.

Crust tip: Everything should be cold including flour and bowl.

1 1/2 cups flour (this last time I used all spelt)
1 Tablespoon sugar
1/2 teaspoon salt
1/4 cup cold unsalted butter, cut into pieces
1/4 cup cold shortening
1/4 cup ice water
  1. Put dry ingredients in the food processor and mix until just blended.
  2. Put in the butter and shortening and mix in short bursts until small pieces. 
  3. Add ice water, one tablespoon at a time and mix until crust just barely pulls together.
  4. Pull into a ball wrap in plastic wrap and refrigerate for at least one hour.
  5. Roll out on a floured surface, or between two sheets of wax paper.  Put in pie pan, crimp edges and put back in fridge for 20 minutes.


Filling
About 6 cups of sliced fruit.
1 Tablespoon Lemon Juice
1/2 cup sugar
2 Tablespoons cornstarch
1/4 teaspoon cinnamon
pinch of ground nutmeg
pinch of cloves
pinch of salt
  1. As you are peeling (if desired) and cutting the fruit, mix in the lemon juice, so the fruit doesn't brown.
  2. Mix together sugar through salt and then gently stir the dry ingredients into the pears and let sit a 5-10 minutes.
  3. Put in the pie crust and put the pie into a preheated 400 degree oven.  Bake for 30 minutes.
  4. After 30 minutes,
    1. Turn the oven to 375 degrees.
    2. Take the pie out and put the crumble on top of it. 
    3. Bake for another 30 minutes or so, until the top is brown and the pears are bubbling.  If needed, cover the edges with aluminum foil so they don't get too brown.


Crumble
1/4 cup flour ( I use wheat)
1/4 cup oats
1/4 cup brown sugar
1/4 cup chopped walnuts
1/2 teaspoon cinnamon
pinch of salt
1/4 cup butter

Mix together in a food processor or with your fingers, until butter is crumbled throughout.  Store in the refrigerator until the pie has baked 30 minutes.


Pie.  Just the word can make people happy - and I'm pretty sure it's not just my husband! 

Wednesday, October 31, 2012

The Mystery Plant

As I may have mentioned, one of the hardest things about moving was giving away all my plants.  There just was not space during the move.  They found wonderful homes with good friends, but I arrived without all the plants I'd taken care of for eight years. 

Well I already have some new plants.  I've had some amazing friends send me some!  I've bought only one so far.  And, the previous owners left me three very cool plants and one of them is super intriguing to me.  Does anyone know what this is?

I have two.  This one has red throughout it's leaves, but the other one is mostly just green.  But, the flowers are what intrigue me!    Notice the bottom right of the picture.

You can practically watch them grow.  First, you notice the pretty fluted holder.


Then all of a sudden something red is growing out of them.


And then surprise, a couple days later they open up!


Now they are both open and they last quite a few days.  How fun!


Sunday, October 28, 2012

Floating in the Clouds


A pretty amazing item about our new home is the weather.  We've been getting a lot of snow and rain, and we'll take any moisture sent our way, no complaints!  This means lots of clouds and often the low hanging clouds surround us as they pass through.

On a quiet, dark Sunday morning I was standing at the sink peeling and cutting up the remaining pears and apples. The pears are turning, so it was time.  As the outside slowly gained light, I would glance up in between each pear and apple, or as I grabbed a sip of warm, fresh coffee.


Every time the view was different.


Once I could see the snowy hills on the other side of the valley.

Next I couldn't see anything but a white haze beyond the patio wall.

Then there would be just pieces of whisp left as we waited for the next cloud to envelop us.  It's pretty magical.


Now, the crock put is full.


The apples and pears are drizzled with one tablespoon of lemon juice, plenty of local honey, lots of cinnamon and a pinch of cloves and we wait.  We wait for the smell to float through the house for the day. 

I can't think of a better way to start a Sunday morning or to use up the last of our apple and pear trees for the season.

Sunday, October 21, 2012

Smoked Fish

Today's post is on one of my families recipes.  This is my Dad's specialty, when the Graff's get together they pretty much expect to have Smoked Fish from my Dad.  He has been really kind about sharing his recipe and has worked with Joe and Joe has been a diligent student.  Joe has practiced and practiced and I must say he makes some pretty good smoked fish.  It's different than my Dad's because back in Wisconsin, he used large Lake Trout from Lake Michigan, where as, Joe has been using much smaller rainbow and lake trout that he catches in Flaming Gorge.

Joe recently did a large batch of smoked fish for our last Green River party and we decided to document the process for the blog.  So here you go.  This is very picture intensive and not everyone will be interested in Smoked Fish.  But you might just be interested in the process of smoking something.

Graff recipe for Smoked Fish - with additional notes from Joe.
(works well with Lake Trout or Rainbows, even Halibut)

Step one, defrost your fish!


Soak fish fillets or chunks in the following brine solution for 8 hours (or overnight).
  • 1 ½ quart of water
  • ½ - ¾ cup of salt  (dissolve salt into water until an egg barely begins to float)
     - aiming for 80° salinity if you have a salinometer
  • ¾ - 1 cup of brown sugar
  • ¼ teaspoon of allspice
  • ½ teaspoon of ginger


Rinse fish briefly under cold water.  (If you don’t rinse then fish may be too salty, if you rinse too much then the fish won’t be salty enough.  Is that specific enough?)  At this point, Joe likes to use a tweezers and pull the bones so no one has to deal with the bones when eating the fish. 

Notes from Joe: Bones: Usually it is easiest to remove the pinbones from the filet after smoking, but this works best with larger filets (> 3 lb fish).  The pinbones on the smaller fish are hard to find beneath the crispy pellicle so I try to remove them ahead of time (before brining) using a strong set of tweezers.  The smallest bones usually don’t create any problems, but I still try to get most of the bones out.


Lay on cooling rack to air dry and sprinkle pepper-lemon seasoning on filets.  Air dry for about 45 minutes before smoking.  This forms the desired pellicle (crystallized varnish) on the surface of the fish, helping preserve the finished product. 


To make the smoke, Joe uses a combination of apple wood chips and shredded cherry wood from our trees.


He then soaks the wood in water.


OPTIONAL: Joe likes to sprinkle some brown sugar on the filets just before smoking.


Smoke with apple wood and/or cherry wood chips, below 200o F for 2.5 – 4 hours (depending on thickness of fish).  Pre-soak the wood chips in water for an hour before smoking.  Usually, the drier the finished fish, the better it tastes.  BUT don’t go too dry.


Notes from Joe: With the smaller fish (< 3 lbs.) I usually get from the Flaming Gorge, I struggle to get enough smoke flavor in the fish before it dries out.  With this said, for smaller fish, keep your brine a little low of salt (1/2 cup instead of ¾) so that it takes longer to smoke the water content out of the fish, allowing it to stay on the smoke longer.  I also place a pan of water between the heat and the fish in order to slow the drying process, again allowing more time in the smoke.  I use an electric smoker so that I have better temperature control.  The challenge of smoking at a low temperature is to ensure that you produce enough heat to create smoke, yet do not create too much heat thus cooking the fish.


The fish was amazing and it went fast.  We only had the below lonely fillets left at the end of the party.  Our favorite thing to do with leftover smoked fish is make dip!


This is one of those annoying instances where I say, "Well, I don't really have a recipe."  It's always slightly different, but these are the basic smoked fish dip additions.
  • I make a base out of cream cheese and plain greek yogurt.  You could use sour cream in place of the yogurt, or even mayo.
  • I add the shredded fish, a handful of fresh chopped parsley, a couple finely chopped green onions, fresh ground pepper and salt to taste.
  • Mix thoroughly and chill to blend the flavors. If you like a creamier dip, feel free to use your food processor to mix. 


Serve with your favorite crackers or carrots and celery and think about how long it might be before you can make more smoked fish dip.  "Hey honey, are you going fishing anytime soon?"